The best end mill shape for your mold depends on your specific needs. You should consider the shape, the finish, and how you will machine it. It's essential to select the right cutting tool for each job to achieve optimal results. A square end mill is ideal for creating sharp corners and flat surfaces, while ball end mills are perfect for crafting smooth 3D shapes. Choosing the right tool path and settings can enhance the surface quality and expedite the finishing process. Hiboo Tool offers robust carbide Square End Mills and Ball End Mills, providing you with the accuracy and reliability required for every mold project.
Key Takeaways
Square end mills make sharp corners and flat areas. They work well for slots and pockets.
Ball nose end mills give smooth finishes on curved surfaces. They are good for 3D shapes.
Bull nose end mills mix corners and lower stress. This helps the tool last longer.
Pick the right end mill for the mold cavity shape. This gives the best results.
Using different end mills together can make surfaces better. It also helps tools last longer.
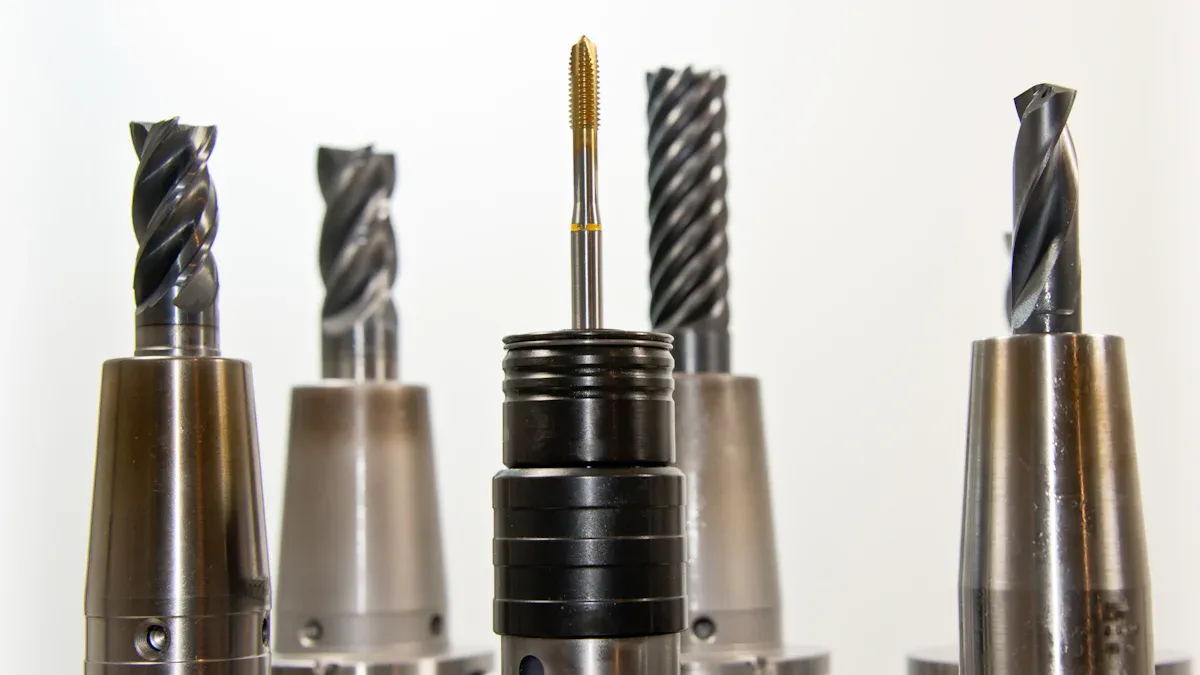
End Mill Types Overview
Image Source: pexels
Square End Mill Basics
A square end mill is used for sharp corners and flat surfaces. It has a square shape with straight edges and a flat bottom. People also call it a flat end mill. This tool is good for making right-angle corners and flat areas. Many machinists use it for slots, pockets, and simple shapes. The flat end mill works in steel and aluminum. Special coatings help the tool last longer and fight wear. Here are some common coatings and what they do:
Coating Type | Key Benefits |
Titanium Nitride (TiN) | Great wear resistance, strong hardness, and good heat control; works for many materials. |
Titanium Carbonitride (TiCN) | Extra hard and resists heat; best for tough steels and fast cutting. |
Titanium Aluminum Nitride (TiAlN) | Very hard and handles heat well; good for rough materials and hot metals. |
Diamond-Like Carbon (DLC) | Slippery and tough; works well for dry and fast cutting. |
Aluminum Titanium Nitride (AlTiN) | Handles heat and chemicals; best for tough cutting jobs. |
Ball Nose End Mill Explained
A ball nose end mill has a round cutting edge. You use it for curved surfaces and 3D shapes. Some shops call it a flat end mill, but its tip is rounded. This tool is great for making molds with tricky shapes. If you want a smooth finish on a curve, use a ball nose end mill. It gives nice finishes and less extra polishing is needed. You can also work faster because you change tools less often. Here are some main benefits:
Advantage | Description |
Increased Productivity | You can cut faster and change tools less, so you make more parts. |
Improved Part Quality | Smooth finishes mean you may not need extra polishing. |
Complex Surface Capability | Good for making detailed, non-flat surfaces, especially in molds and dies. |
Bull Nose End Mill (Corner Radius) Features
A bull nose end mill has a flat bottom and rounded edges. The rounded part is called a corner radius. Use a bull nose end mill to avoid sharp corners in your mold. The corner radius lowers stress on the tool and the part. This helps the tool last longer and stops edges from breaking, even in hard materials. You also get smoother corners, which makes your finished part look better. Here is why the bull nose end mill is special:
Aspect | Description |
Tool Life | The rounded edge lowers stress and helps the tool last longer. |
Edge Chipping | The curve keeps edges from breaking, even when cutting hard stuff fast. |
Stress Distribution | Cutting forces spread out over the curve, so wear is less. |
Surface Finish Quality | Makes smoother corners than sharp flat mills. |
Tip: If you need to cut a mold with flat spots and smooth corners, try a bull nose end mill for better results.
Type of End Mill | Characteristics | Typical Use Cases |
Square End Mill | Has a square shape with sharp edges and a flat bottom. | Used for making right-angle corners and flat areas. |
Ball End Mill | Has a round cutting edge for curved surfaces and 3D shapes. | Used for cutting curves; may need extra finishing. |
Bull Nose End Mill | Has rounded edges at the bottom corners for a smooth curve. | Used for adding corner radius; works well with hard materials. |
Key Differences and Features
Cutting Edge Geometry
You need to understand how tool geometry shapes your results. Each end mill type has a unique geometry that affects how it cuts and what shapes you can make. Look at this table to see the main differences:
Type of End Mill | Geometry Description | Applications | Advantages |
Square End Mill | Sharp, square corners for 90° angles | Flat surfaces, slots, pockets | Versatile, common for many tasks |
Ball Nose End Mill | Rounded tip for smooth, curved surfaces | 3D shapes, contours, mold cavities | Smooth finish, avoids sharp steps |
Bull Nose End Mill | Flat bottom with rounded corners (corner radius) | Filleted corners, blended transitions | Strong edge, reduces scalloping, versatile |
A flat end mill gives you sharp corners and flat bottoms. A ball nose end mill creates smooth curves and 3D shapes. A bull nose end mill, also called a corner radius end mill, combines a flat bottom with rounded corners. This design helps you avoid scalloping and keeps the cutting edge strong. Good tool geometry also helps chips move away from the cut and keeps heat low. Chips must leave the cavity right away. If they do not, you get more heat, tool wear, and a poor surface finish.
Tool Strength and Durability
You want your tools to last and stay strong. The flat end mill has sharp corners, but these can chip if you push the tool too hard. The ball nose end mill has a weaker tip, so it can wear out faster at the center. The bull nose end mill stands out for strength. Its rounded corners give better shock resistance and make the tool more rigid. You get the roughing power of a square end mill and the durability needed for shallow contours. This reduces the risk of chipping at the corners and helps you work longer without changing tools.
Ball nose end mills can deflect and wear at the tip.
Bull nose end mills resist shock and last longer.
Flat end mills may chip at sharp corners if overloaded.
Surface Finish Results
You want a smooth surface finish on your mold cavity. The ball nose end mill is best for this job. It creates a smooth surface finish on curved shapes and 3D contours. The bull nose end mill also helps with surface finishing. Its rounded corners blend transitions and reduce rough spots. The flat end mill works well for flat areas but may leave sharp steps on curves. For the best results, use the right tool for each area. Advanced coatings and high-quality carbide, like those from Hiboo Tool, improve tool life and keep your surface finish consistent.
Tip: Use high-pressure coolant to clear chips fast. This keeps your tool cool and your surface finish smooth.
Square End Mill vs. Ball Nose vs. Bull Nose
Strengths and Weaknesses
When you choose a cutting tool for mold cavity machining, you need to know what each tool does best and where it might fall short. The right choice helps you get better results and avoid problems during machining. Here is a table that shows the main strengths and weaknesses of each type:
Type of End Mill | Strengths | Weaknesses |
Square End Mill | Ideal for general-purpose milling, slotting, and creating sharp internal corners. | Prone to chipping under heavy load; not suitable for finishing curved surfaces. |
Ball Nose End Mill | Excellent for 3D contouring and sculpting; produce smooth finishes on curved surfaces. | Less efficient for flat surface removal; fragile tip can break easily. |
Bull Nose End Mill | Stronger than square-end mills due to rounded corners; better heat dissipation and longer tool life. | Cannot produce perfectly sharp inside corners. |
You can see that the square end mill works well for flat surfaces and sharp corners. The ball nose end mill gives you smooth finishes on curved shapes. The bull nose end mill stands out for strength and durability because of its rounded corners. If you use a flat end mill, you get sharp edges, but the tool may chip if you push it too hard. The ball nose end mill can break at the tip if you use it for heavy cutting. The bull nose end mill resists chipping and lasts longer, but it cannot make perfectly sharp inside corners.
Tip: If you want to avoid tool breakage and get longer tool life, try using a bull nose end mill for roughing and semi-finishing. Save the ball nose end mill for the final finishing pass.
Best Applications
You need to match the right tool to the job. Each end mill geometry works best for certain tasks in mold cavity production. Here are some common applications for each type:
Square end mill:
Use this tool for slotting, pocketing, and making flat surfaces. You can create sharp corners and straight walls. The flat end mill is perfect for roughing out basic shapes and cutting flat areas in steel or aluminum.
Ball nose end mill:
Choose this tool for sculpting 3D shapes and finishing curved surfaces. You get a smooth finish on contours and complex mold cavities. The ball nose end mill is best for the final pass when you want a polished look.
Bull nose end mill:
This tool works well for blending corners and transitions. You can use it for roughing and semi-finishing because the rounded corners reduce stress and help the tool last longer. The bull nose end mill is great for cutting fillets, blending flat and curved areas, and machining hard materials.
Here is a table that shows which tool works best for each operation:
Operation Type | Recommended End Mill Geometry |
Roughing | Round inserts and concepts with radius (bull nose end mill) |
Semi-finishing | Round inserts and concepts with radius (bull nose end mill) |
Finishing | Ball nose end mill and concept with radius (bull nose end mill) |
You can use a flat end mill for the first cuts to remove material quickly. Switch to a bull nose end mill for blending and smoothing transitions. Finish with a ball nose end mill to get a high-quality surface on curved shapes.
Note: If your mold cavity has both flat areas and curved surfaces, you may need to use more than one type of end mill. This helps you get the best finish and tool life.
Tool Selection Guide for Mold Cavities
Matching Tool to Cavity Shape
You need to match your cutting tool to the shape of your mold cavity. This step helps you achieve accurate results and avoid problems during milling operations. Each end mill geometry works best for certain shapes. If you want sharp corners and flat bottoms, use a square end mill. This tool creates clean slots and straight walls. For deep pockets and areas with tight angles, the square end mill gives you precise control.
When you work with complex 3D contours or curved surfaces, choose a ball nose end mill. This tool sculpts smooth transitions and blends shapes. If your mold cavity has fillets or rounded corners, select a bull nose end mill. The rounded edge strengthens the cutting tip and helps you avoid chipping. You get better durability and a top-tier finish in these areas.
Here is a table to help you decide which tool fits your cavity shape:
End Mill Type | Recommended Use | Key Features |
Square (Flat) End Mill | Flat-bottomed pockets, straight walls, sharp corners | Creates sharp, 90° corners and flat bottoms |
Ball Nose End Mill | 3D contouring, complex surface sculpting | Produces smooth, blended surfaces |
Bull Nose End Mill | Milling pockets with corner radius | Rounded corners strengthen cutting edge |
Tip: For mold-making, always check your cavity design before choosing the right tool. This step saves time and improves accuracy.
Surface Finish Considerations
You want your mold cavity to have a smooth surface finish. The right tool geometry and machining strategy help you reach this goal. A ball nose end mill works best for surface finishing on curved shapes. It produces a smooth surface finish and reduces the need for extra polishing. If you blend flat and curved areas, use a bull nose end mill. The rounded corners help you avoid rough spots and create a seamless look.
When you need sharp edges and flat surfaces, use a square end mill. This tool gives you crisp lines but may leave steps on curved areas. For a top-tier finish, combine different tools for each section of your mold. Use advanced coatings and carbide materials to keep your tools sharp and extend their life.
Note: Always inspect your surface finish after each pass. Adjust your feed rate and cutting speed to improve results.
Machining Strategy Tips
You can improve your results by following smart machining strategies. Start with roughing operations using a bull nose end mill. This tool handles efficient roughing and removes material quickly. For finishing passes, switch to a ball nose end mill. This step helps you achieve a smooth surface finish on complex shapes.
Balance your cutting speed and feed rate to avoid tool wear. Use high-quality carbide tools for longer life. Make sure you evacuate chips quickly to prevent damage and keep your material removal rate high. Apply coolant or lubrication to reduce heat and friction. Choose the right geometry for each stage of cnc machining.
Here are some tips for better milling operations:
Set optimal cutting speed to prevent excessive heat.
Adjust feed rate to avoid chipping and friction.
Use proper chip evacuation to protect your tools.
Select carbide tools for durability.
Apply coatings to reduce wear.
Use coolant for longer tool life.
Tip: Choosing the right tool and strategy helps you get the best surface finish and extends your tool life.
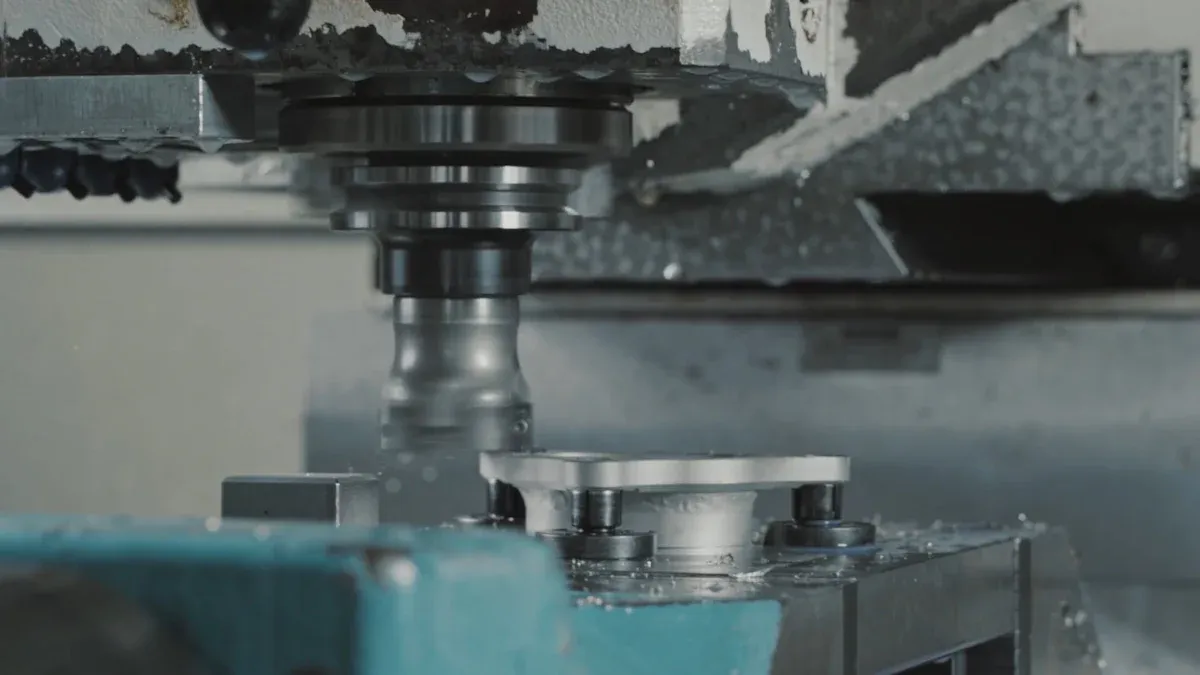
Toolpath Strategies and Real-World Examples
Image Source: pexels
Flat Surfaces and Slots
Many mold cavities need flat surfaces and slots. Square end mills are the best choice for these jobs. You can use different toolpath strategies to make your work more accurate and help your tool last longer. Here is a table that lists common strategies and their benefits:
Toolpath Strategy | Description | Benefits |
High-Speed Machining | Uses shallow cuts and high speeds to keep chip thickness steady. | Lowers cutting force and heat, so parts stay accurate. |
Trochoidal Milling | Moves in circles to cut less material at once. | Makes cutting easier and can save time, especially with tough metals. |
Adaptive Clearing | Changes how much the tool cuts to keep the spindle working well. | Uses power well and stops vibration, good for tricky shapes. |
Ramped or Helical Entry | Tool goes down at an angle or in a spiral. | Helps protect the tool and makes the surface smoother. |
Controlled Engagement | Cuts material layer by layer with only part of the tool. | Stops bending and overheating, so the tool lasts longer. |
Chip Evacuation | Gets chips out of the way fast. | Keeps the tool working well, often with coolant or air. |
Try high-speed machining for flat spots. Trochoidal milling is good for hard metals. Adaptive clearing works well for tricky shapes. Always clear chips quickly to keep your tool sharp and the surface clean.
3D Contours and Curved Cavities
Machining 3D shapes and curves can be hard. Ball nose end mills help you get smooth finishes and the right shapes. The round tip leaves fewer marks and lets you cut deep grooves and curved areas. You can use these strategies for molds, airplane parts, and car parts. Here is a table that compares ball nose and flat end mills:
Feature | Ball Nose End Mill | Flat End Mill |
Surface Finish | Great for smooth surfaces | Can leave marks |
Curvature Handling | Best for tricky curves | Only works on flat spots |
Tool Path Optimization | Works well in 3D CAM | Not as good for 3D shapes |
Use multi-axis toolpaths and 5-axis machines for tough shapes. These methods help you reach tight spots and make detailed parts. Ball nose end mills are great for 3D shapes and finishing passes, giving you a nice finish.
Tip: Always check your CAM settings before contouring. This helps you avoid missing spots and keeps surfaces smooth.
Blended Corners and Transitions
Blending corners and transitions is important in mold cavities. Bull nose end mills are best for this job. These tools have a flat bottom and rounded edges, so you can mix flat and curved shapes without lines showing. Use contouring passes to make smooth fillets and connect features.
PCD ball nose end mills also help with 3D shaping and finishing. They are important for making molds and tiny details. You can cut cavities and cores with smooth transitions and blended corners.
Note: Always look at your blended areas after contouring. This makes sure your mold cavity looks good and works well.
Common Mistakes to Avoid
When you choose end mills for mold cavities, you want to avoid common mistakes that can lead to poor results, wasted time, and higher costs. Paying attention to tool strength, surface finish needs, and tool selection helps you get the best outcome.
Overlooking Tool Strength
If you ignore tool strength, you risk tool failure and part defects. A weak tool can bend or break during cutting. This often causes problems like short shots, leaks, or even cosmetic issues such as burn marks and flash on your mold parts. You may also see higher scrap rates and longer production times.
If the flash is perpendicular to clamp force, it is typically caused by tool deflection and a weak design.
You want to use a tool with the right geometry and strength for your material and cavity shape. Stronger tools last longer and help you avoid costly downtime and rework.
Ignoring Finish Needs
Surface finish matters in mold making. If you do not match your tool to the finish you need, you may face extra work and higher costs. For example, using the wrong end mill can leave rough surfaces that require more polishing or grinding.
You may spend more money on extra finishing steps.
Machining takes longer when you need a finer finish.
The final product may not meet quality standards.
You might need to add post-processing steps to fix the surface.
Always check your finish requirements before you start. Choose the right tool to get the finish you want in fewer steps.
Wrong Tool for the Job
Using the wrong end mill geometry can slow down your work and hurt part quality. For example, ball nose end mills need very small stepovers to get a smooth finish. This means you must make many passes, which takes more time. Some tools, like circle-segment end mills, can finish the same area in fewer passes.
Ball nose end mills increase machining time for large flat areas.
The wrong tool can leave unwanted marks or steps on your part.
You may need to redo work or change your strategy mid-process.
Pick the right tool for each part of your mold cavity. This saves time and gives you better results.
Tip: Review your tool choices and machining plan before you start. This helps you avoid mistakes and keeps your project on track.
Tips for Optimal Tool Use
Combining End Mill Types
You can get the best results in mold cavity machining by combining both tools. Each end mill type has its own strengths. When you use them together, you improve efficiency and surface quality. Here are some tips for using different end mills in your process:
Select end mills based on the mold material and the features you need to machine.
Use a trochoidal-style toolpath for roughing hard materials. This reduces heat and helps your tools last longer.
Try modular systems with exchangeable inserts for more flexibility.
Choose end mills with coatings that protect against heat and reduce chip buildup.
Keep a variety of end mills in stock if you see repeat patterns in your mold designs.
You can also explore new carbide ball nose and torus end mills for moldmaking. Ceramic end mills work well for high-temperature materials. Tapered circle segment end mills can save time and give you a great finish.
Tool Life and Cost
You want to keep your tool life long and your costs low. Proper tool selection and usage help you do this. When you increase the number of cavities in your mold, you can make more parts per hour. This lowers the cost for each part because you share machine time and labor across more pieces. For example, a single operator can run an eight-cavity mold and produce eight times the output compared to a single-cavity tool. As you add more cavities, your savings grow even more.
Tip: A small increase in tool cost often pays off by reducing machine time and lowering the final price per part.
Programming and Setup
Good programming and setup make a big difference in milling. Always use the shortest tool and tool holder possible to keep your setup rigid. Set the right speeds and feeds for your material. Apply coolant to manage heat and clear chips. Listen for a steady hum during cutting. Check your chips—small, tight curls mean a healthy cut. Long, stringy chips may mean you need to adjust your feed rate.
Note: Rigidity is key. Use high-quality holders and keep tool stick-out short to avoid chatter and tool breakage.
Why Choose Hiboo Tool?

Product Range and Customization
You need tools that work for your job. Hiboo Tool gives you lots of choices for making molds. You can pick carbide square end mills, ball nose end mills, or corner radius end mills. Each tool is built to last and work well. Hiboo Tool uses high-quality micro-grain carbide and special coatings. These things help you cut hard materials and keep your tools sharp.
Here are some reasons Hiboo Tool is a good choice:
Micro-grain carbide makes the tools strong and dependable.
Special designs help you make accurate cuts every time.
Multi-layer nano-coatings (TiAlN, AlCrN) protect tools from heat and wearing out.
The surface can be as hard as HRC65, so you can cut tough stuff.
Sharp cutting edges give you the same results each time.
The flute design helps chips get out fast and keeps things cool.
Tools last 3-5 times longer than regular end mills.
They stay steady in deep cavities and at high speeds.
You can also make your end mills just how you want. Hiboo Tool lets you pick the size, shape, and number of flutes you need. Check out the table below for your choices:
Customization Aspect | Description |
Size | You can get custom sizes for your job |
Geometry Design | You can pick the shape that fits your needs |
Flute Number | You can choose how many flutes for your work |
Quality and Service Commitment
You want tools that are good and help when you need it. Hiboo Tool checks every tool with special machines. You get tools that are accurate and last a long time. The company has customer service and tech support all day, every day. If you have a question or need help, you get answers quickly. Hiboo Tool listens to you and helps you pick the right tool. You can count on Hiboo Tool for your mold-making jobs.
Tip: When you pick Hiboo Tool, you get more than a tool. You get a team that wants you to do well.
You should pick the right tool for your mold cavity. Each end mill shape has its own benefits. Square end mills make sharp corners and flat areas. Ball nose end mills give smooth finishes on curved shapes. Bull nose end mills help blend corners and make surfaces smoother. Look at your cavity shape and what you want to do before choosing tools. Using more than one end mill can give better results. The shape and coating of your tools change how smooth the surface will be. Hiboo Tool has strong and custom tools for any mold project.
Tip: Try contour milling and bigger tool sizes to work faster and keep cutting longer.
FAQ
What end mill should you use for sharp corners in a mold cavity?
You should use a square end mill. This tool creates clean, 90-degree corners and flat surfaces. It works best for slots, pockets, and areas that need precise edges.
How do you get a smooth finish on curved surfaces?
You should choose a ball nose end mill. The rounded tip helps you create smooth, blended surfaces on 3D shapes. This tool reduces the need for extra polishing.
Why does a bull nose end mill last longer?
A bull nose end mill has rounded corners. This design spreads cutting forces and lowers stress. You get better tool life and fewer broken edges, especially in hard materials.
Tip: Use a bull nose end mill for blending corners and transitions in mold cavities.
Can you use more than one end mill for one mold cavity?
Yes, you can combine different end mills. Start with a square end mill for roughing. Switch to a bull nose or ball nose end mill for finishing and blending. This method improves surface quality and tool life.
What makes Hiboo Tool end mills different?
Hiboo Tool uses micro-grain carbide and advanced coatings. You get strong, precise tools that last longer. You can also request custom sizes and shapes for your specific mold cavity needs.
 English
 العربية
 Français
 Русский
 Español
 Português
 Deutsch
 italiano
 日本語
日本語 한국어
한국어 Nederlands
 Tiếng Việt
 ไทย
ไทย Polski
 Türkçe
 ພາສາລາວ
 ភាសាខ្មែរ
 Bahasa Melayu
 ဗမာစာ
ဗမာစာ Filipino
 Bahasa Indonesia
 magyar
 Română
 Čeština
 Монгол
 қазақ
қазақ Српски
 हिन्दी
 فارسی
فارسی Slovenčina
 Slovenščina
 Norsk
Norsk Svenska
 українська
 Ελληνικά
 Suomi
Suomi Հայերեն
 עברית
עברית Latine
 Dansk
Dansk বাংলা
বাংলা Hrvatski
 Gaeilge
 Oʻzbekcha
 latviešu
 Беларуская мова
 Български
 Lietuvių
 Gaelo Albannach
 ئۇيغۇرچە
 Cymraeg