 Image Source: pexels
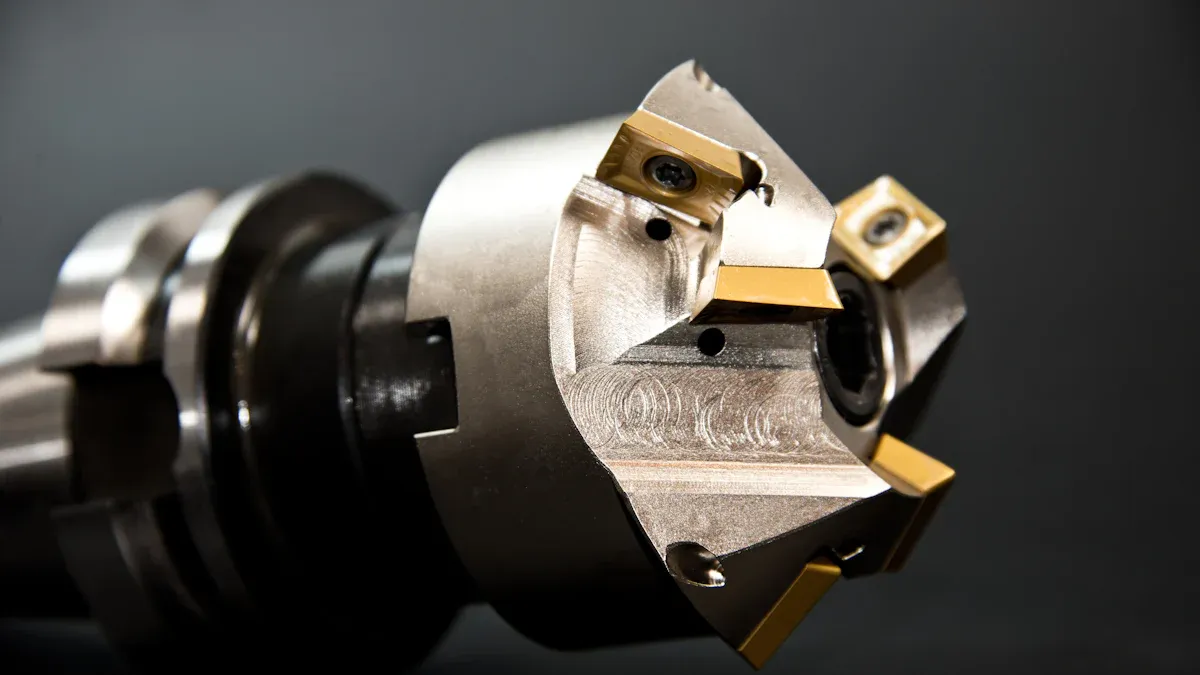
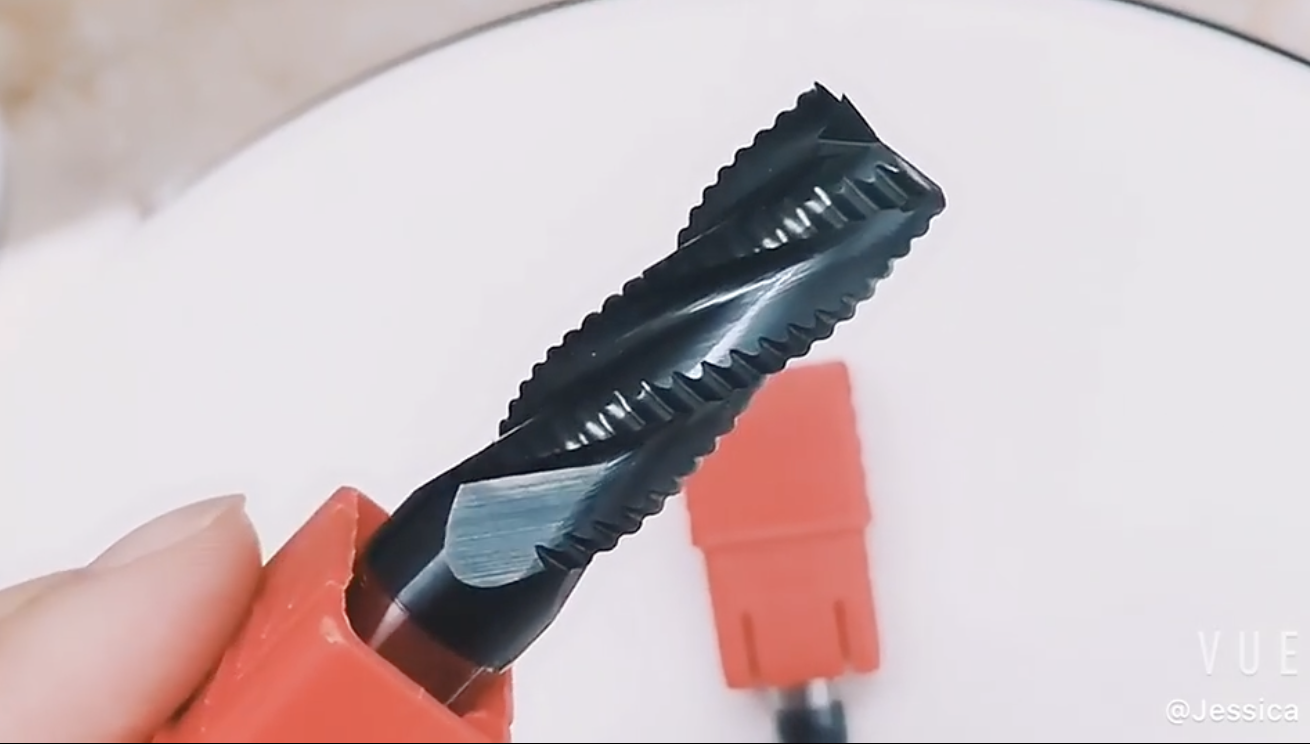
A roughing end mill is a specialized tool used in milling to rapidly remove large amounts of material from a workpiece. This roughing end mill features a rough, serrated edge with deep grooves that help break up chips and efficiently move them away from the cutting area. Using a roughing end mill allows you to make rough cuts much faster than with standard tools, enabling you to complete the initial stage of CNC machining more quickly and save valuable time.
Industry research shows that roughing end mills improve machining by:
Cutting material faster, which shortens production times.
Efficiently moving chips away and dissipating heat, which extends tool life.
Increasing overall productivity while reducing costs.
By understanding how a roughing end mill works, you can select the right tool for your cutting job and enhance your milling results.
Key Takeaways
A roughing end mill cuts away lots of material fast. This helps finish the first milling step quickly. Its jagged edges break chips into tiny bits. This lowers heat and tool damage. It also helps chips move away better. Pick the right flute count, coating, and size for your job. This helps the tool work well with your material. Use roughing end mills for quick, rough cuts. Switch to finishing end mills for smooth, exact surfaces. Set the tool up right and use the best cutting settings. Coolant helps the tool last longer and work better. Clean, check, and store your roughing end mills often. This keeps them sharp and ready to use. Look for signs of tool wear and strange noises. Fix problems early to stop damage or bad finishes. Good roughing end mills may cost more at first. But they last longer and cut faster, saving time and money.
Roughing End Mill Basics
What Is a Roughing End Mill
A roughing end mill is used when you need to quickly remove a lot of material at the start of machining. This tool looks different because it is made for a special job. In factories, a roughing end mill has big, rough teeth and several flutes, usually three to seven. These flutes help make lots of small chips as you cut the workpiece. The main job of this tool is to take away large amounts of material fast, so it is great for roughing before finishing.
A roughing end mill has a coarse pitch, so you can cut deeper with less effort.
Serrated cutting edges help slice tough materials and break them into big pieces.
The tool’s shape lets you remove lots of material and get the surface ready for finishing.
You can use roughing end mills on many types of metal, like steel, stainless steel, high-temperature alloys, and non-ferrous metals.
The number of flutes, the angle of the helix, and the coarse pitch all help the tool work well for heavy-duty jobs.
When you pick a roughing end mill, you get a tool made for speed and saving time. It is best when you want to shape a workpiece fast and get it ready for more careful cuts.
How It Works
A roughing end mill uses its strong teeth to cut away lots of material quickly. You put the tool in your CNC machine, and as it spins, the serrated edges dig into the workpiece. The many flutes and coarse pitch let you cut deeper and faster than a regular end mill.
The roughing step is about removing material fast, not making the surface smooth.
The tool’s design lets you use faster feed rates and deeper cuts, so you finish roughing sooner.
The serrated teeth break chips into smaller bits, which lowers cutting pressure and heat.
You can use roughing end mills for shaping, slotting, and profiling hard materials in places like car factories, airplane factories, and mold shops.
When you use a roughing end mill, you often see thick, comma-shaped chips coming off the workpiece. This chip shape means the tool is working right, breaking up material and moving it away. The roughing step also helps you find problems in the raw material early, so you can fix or replace parts before wasting time.
Tip: Roughing end mills let you remove more material at once, so you finish faster and get the surface ready for a finishing cut.
Serrated Edge Design
The wavy or serrated edge is what makes a roughing end mill work so well for roughing. These edges break long chips into smaller, easier-to-handle pieces. This helps control chips and stops problems like chips getting stuck or the tool jamming.
Serrated edges let more chips fit in the flutes, so chips come out easier.
The design lowers cutting resistance and heat, which helps the tool last longer and keeps cuts smooth.
You can run your CNC machine with higher chip loads and feed rates, so you remove more metal.
Studies show serrated end mills lower cutting forces and make the tool more stable by breaking up the chip load. This means less shaking and better results.
Special serration shapes can lower cutting forces by up to 30%, making roughing even better.
When you use a roughing end mill with a wavy edge, you also get less vibration and noise. This makes your work more stable, even at higher speeds. The serrated design helps chips move out and keeps the tool from getting too hot or worn out.
Note: Many machinists say roughing end mills with serrated edges need less chip clearing by hand, so you save time and effort on long jobs.
Features
Tooth Geometry
When you see a roughing end mill, the teeth look special. The teeth have a jagged, serrated shape. This shape helps break up chips while cutting. The rough teeth cut tough materials and make smaller chips. You get less shaking and noise because the fine tooth pitch keeps the cut steady. A 30° helix angle works with the teeth to keep cutting smooth. The right shape lets you use faster speeds and feeds, so you finish roughing sooner.
Fine tooth pitch helps stop shaking and noise.
The 30° helix angle makes cutting more stable.
Serrated teeth break chips into small pieces for easy removal.
TiCN coating on fine teeth stops edge build-up and protects from heat and wear.
This mix lets you run machines 35 to 50% faster than with tools that have no coating.
You get longer tool life and better results with the right tooth shape. The design helps you remove more material with less work. Your roughing jobs get done faster and easier.
Flute Count
The number of flutes on a roughing end mill matters a lot. Most roughing end mills have fewer flutes, usually two or three. These wide spaces give chips more room to get out. When you cut a lot of material, chip removal is very important. If chips fill up the flutes, your tool can jam or get too hot.
For soft, non-ferrous metals, you often use two-flute roughing end mills. These let you cut faster and remove more material because chips have lots of space. For harder metals, you might use four or more flutes, but roughing still works better with fewer flutes for good chip removal. New machining lets you use three-flute tools for non-ferrous metals, which balances speed and chip removal. The right number of flutes keeps your roughing job smooth and easy.
Coatings
Picking the right coating for your roughing end mill helps it last longer and cut better. Coatings protect your tool from heat, wear, and rubbing. They also let you use higher speeds and feeds, which is important for roughing.
Here is a table showing common coatings and what they do:
Coating | Material | Key Benefits | Suitable Materials |
Titanium Nitride (TiN) | TiN | Makes tool last longer, keeps cool, lowers friction | Steel, stainless steel, cast iron, general use |
Titanium Carbo Nitride (TiCN) | TiCN | Makes tool tougher, resists scratching, lets you cut 50% faster | Stainless steel, aluminum, copper, cast iron, abrasive alloys |
Aluminum Titanium Nitride (AlTiN) | AlTiN | Handles high heat, stays hard at high temps | Titanium, tool steel, alloy steel, stainless steel, nickel alloys |
Titanium Aluminum Nitride (TiAlN) | TiAlN | Very hard, keeps heat out, resists chipping, lets you cut twice as fast | High strength steels, hard die steels, high-temp alloys |
You often see TiAlN and AlTiN coatings on roughing end mills. These coatings keep your tool hard when it gets hot and stop chipping. Some new coatings, like AlCroNa, can take even more heat and last longer in tough jobs. When you use coated roughing end mills, your tool lasts longer and works better, especially at higher speeds.
Tip: Always pick a coating that matches the material you are cutting. This helps you get the best results from your roughing end mill.
Roughing vs. Finishing End Mill
Cutting Action
There are big differences in how these two tools cut. A roughing end mill has large, strong teeth and wavy flutes. These teeth dig deep into the material and make big chips. This lets you use more force and take deeper cuts. You can shape your workpiece much faster with this tool.
A finishing end mill is not the same. It has more teeth that are smaller and sharper. The flutes are smooth. This tool makes small chips and uses less force. You get better control and more accuracy for the final shape.
Here is a table to help you see the differences:
Aspect | Roughing End Mills | Finishing End Mills |
Tool Design | Larger, aggressive teeth with wavy flutes for big chips | More teeth, smaller sharper edges, smooth flutes |
Cutting Force | Higher cutting forces due to larger chip loads and deeper cuts | Lower cutting forces with smaller chips and shallower cuts |
Material Removal | High efficiency in rapid bulk material removal | Lower material removal rate, focused on precision |
Feed Rate & Depth | High feed rates and deep cuts for fast shaping | Slower feed rates and shallow cuts for accuracy |
Surface Finish | Rougher surface due to aggressive cutting | Smooth, fine surface finish |
Efficiency Focus | Maximizes speed and bulk removal despite higher forces | Prioritizes dimensional accuracy and surface quality |
Tip: Use a roughing end mill to shape fast. Use a finishing end mill for the final details.
Material Removal Rate
If you want to take off a lot of material quickly, use a roughing end mill. This tool removes material at a high rate. You can use a slower cutting speed but increase the feed per tooth and depth of cut. This means you remove more material in less time. For example, when milling P20 HH mold steel, roughing uses a cutting speed of about 120 m/min. You also use a high feed and deep cut. This helps you finish roughing fast.
A finishing end mill works at a higher cutting speed, about 210 m/min. But it uses a lower feed per tooth and a shallow cut. This makes the material removal slower. You use this tool to get a better surface finish and the exact size you need.
Start with a roughing end mill for the first stage. This tool saves time by removing most of the material. Then switch to a finishing end mill for a smooth surface and the right shape.
Surface Finish
The surface finish from each tool is very different. A roughing end mill leaves a rough surface. This happens because it cuts fast and uses strong teeth. The chips are bigger and the marks are deeper. This rough look is normal after roughing.
A finishing end mill gives a much smoother surface. This tool is made for fine, even cuts. You can often get a smooth finish in just one pass. Industry standards say the surface finish from end milling is between 0.29 and 0.95 µm Ra. This is good for most parts. But roughing end mills always leave a rougher finish than finishing end mills.
Note: Always use a finishing end mill after roughing if you want a smooth surface or need tight sizes.
Use a roughing end mill when you want speed and to remove lots of material. Switch to a finishing end mill for a fine surface and exact size. This two-step process helps you get the best results in your milling projects.
Applications
Suitable Materials
You can use a roughing end mill on many materials. This tool works for both soft and hard metals. Here are some examples of what you can cut with roughing end mills:
Aluminum: 2-flute or 3-flute end mills clear chips fast and keep cool.
Cast iron: Solid carbide or cobalt roughers handle tough surfaces and remove material quickly.
Titanium: Cobalt corncob roughers cut through this strong metal.
Hot rolled steel: Roughing end mills take off lots of material easily.
Stainless steel and other ferrous metals: 4-flute end mills give smoother finishes.
Non-ferrous alloys: These tools are good for quick roughing and chip removal.
Plastics (like HDPE): Single flute cutters stop melting and help remove chips.
Wood: 2-flute end mills are best for clearing big chips.
Most roughing end mills are made from solid carbide or cobalt steel. These materials let you run your cnc machine fast and work on hard pieces. You can use them for many jobs, so roughing end mills are a smart choice.
Common Uses
Roughing end mills are used in many industries. Their main job is to remove material fast at the start of milling. Here are some common ways people use them:
Automotive: Machine parts quickly and save time.
Aerospace: Shape complex parts like turbine cartridges and airplane parts.
Mold making: Remove extra material before finishing the mold.
Metal manufacturing: Cut tough materials like cast iron, steel, and alloys.
Energy and power: Machine big, thick parts for power equipment.
Construction and electronics: Make parts that need to be strong and look good.
Roughing end mills help you make deep slots, pockets, and holes. Their serrated flutes break chips into small pieces. This keeps the tool cool and lowers cutting force. You can use faster feed rates and deeper cuts, so you finish roughing sooner. This tool works for many jobs and helps you get more from your cnc machine.
Tip: Use roughing end mills first to remove material. Switch to a finishing tool for a smooth surface.
Limitations
Roughing end mills have some limits you should know. These tools can struggle with very hard materials like hardened steels or titanium. Climb milling with roughing end mills can cause high forces at the start. This may chip the tool or wear it out early.
Machines that are not very strong or old cnc machines may have trouble with roughing. You might see vibration, chatter, or the tool pulling in. In these cases, using conventional milling gives you more control. But it can also make more heat and wear out the tool faster. This can leave a rough surface, burrs, or even break the tool.
You need to pick the right milling plan for your machine, material, and finish. If you use roughing end mills in weak setups or on very hard materials, watch for tool wear and machine problems. Always plan your milling steps to get the best results and avoid problems.
Choosing a High-Quality Roughing End Mill
Selection Factors
When you choose a high-quality roughing end mill, you need to think about several important factors. The right choice helps you get better results in your milling operations and saves you time and money. Here are some key points to consider:
Pick a flute count between 3 and 5 for roughing. This range gives you a good balance between chip removal and tool strength.
Look for flute geometry with a corner radius. This shape reduces chipping and helps your tool last longer.
Match the cutter diameter to the size of the feature you want to machine. A larger diameter gives more rigidity, while a smaller one fits tight spaces.
Make sure the shank size fits your machine collet. This keeps your tool stable during roughing.
Choose coatings that match your workpiece material. For example, TiN or TiAlN coatings work well for steel and high-temperature alloys.
Use coolant or lubrication to keep your tool cool and extend its life.
Maintain your tools by cleaning and checking them often. This ensures you get a consistent surface finish and reliable performance.
Tip: Always match your roughing end mill to the material and the type of cut you plan to make. This helps you get the most out of your tool.
Here is a table to help you compare some important selection factors:
Factor | Recommendation |
Flute Count | 3-5 flutes for roughing, larger flute valleys for chip evacuation |
Cutter Diameter | Choose based on job size; larger for rigidity, smaller for tight spaces |
Length of Cut | Use only as much as needed to reduce chatter and improve stability |
Tool Profile | Corner radius for longer life, square profile for sharp corners |
Coatings | Match to material and cutting conditions for better tool life |
Application Type | Know your operation (slotting, HEM, traditional roughing) and material properties |
Sizing
The size of your roughing end mill affects how well it works for different tasks. You need to pick the right size for your job and your machine.
Larger diameter end mills remove material faster. They give you more rigidity and help spread out cutting forces. This means less tool wear and longer life.
Smaller diameter end mills are better for detailed work. They fit into tight spaces and help you make fine cuts.
Harder materials often need smaller end mills. This reduces the risk of tool breakage by focusing the cutting force.
Your machine’s power and rigidity limit the size of the end mill you can use. If you use a tool that is too big, you might see vibration or bending.
Shorter tools are more stable and less likely to vibrate. Use longer tools only when you need to reach deep features.
Note: Always check your machine’s limits before choosing a large roughing end mill. The right size gives you better control and a smoother surface finish.
Cost vs. Performance
When purchasing high-quality carbide roughing end mills, you might notice a big difference in price between brands. You may wonder if the higher cost is worth it. Many users find that premium brands like Kennametal or OSG offer better durability, longer tool life, and higher speeds. These tools often last longer and perform better in tough roughing jobs.
High-quality roughing end mills from top brands can handle more parts before wearing out. This means you spend less time changing tools and more time milling.
Special coatings like TiN or TiAlN let you run your tools faster and keep them sharp longer.
Some brands, like Harvey Tool, make end mills for special jobs. These tools solve unique problems and add versatility to your shop.
Case studies show that using a high-quality roughing end mill can cut cycle times and increase tool life by over 100%. For example, a Helical Solutions end mill made 900 parts in one run, much more than a standard tool.
Tip: When purchasing high-quality carbide roughing end mills, look at both the price and the value. A tool that costs more up front can save you money in the long run by lasting longer and working faster.
Choosing a high-quality roughing end mill helps you get better results, save money, and enjoy more versatility in your milling projects. Always weigh your options and pick the tool that fits your needs best.
Best Practices
Cutting Parameters
You need to set the right cutting parameters to get the best results from roughing end mills. Start by choosing the material you want to machine, such as aluminum, titanium, or tool steel. Next, pick the correct feed per tooth based on the mill diameter and the material. This step helps you control how much material each tooth removes during roughing.
Follow these steps to set your cutting parameters:
Select the material for your milling job.
Choose the right feed per tooth for your roughing end mill.
Find the chip load factor by looking at the radial depth of cut.
Pick the surface feet per minute (SFM) that matches your material.
Calculate the spindle speed (RPM) using the SFM and tool diameter.
Figure out the feed rate (IPM) using RPM, number of flutes, chip load factor, and feed per tooth.
If you want to be careful, lower the SFM a bit but keep the feed per tooth steady. This helps avoid chatter and keeps your roughing operation stable.
Here is a table to help you understand the main cutting parameters:
Parameter | Description |
Flutes (F) | Number of cutting edges on the end mill |
Diameter (D) | Diameter of the cutter |
Chip Load | Material removed per tooth |
Feed Rate (IPM) | Inches per minute the workpiece moves |
Depth of Cut (DOC) | How deep the end mill cuts into the part |
Surface Feet per Minute (SFM) | Cutting speed at the cutter’s edge |
RPM | Spindle speed, calculated from SFM and diameter |
Tip: Do not let the depth of cut go past the flute length. Keep the width of cut below two-thirds of the cutter diameter. Use the largest cutter you can, but keep a 1:1 depth-to-diameter ratio for deep cuts.
These best practices for using roughing end mills help you get efficient and stable results in your milling operations.
Tool Setup
Proper tool setup makes a big difference in roughing. You want your cutting tool to stay secure and steady during milling. Use advanced tool holders like hydraulic or shrink-fit holders. These holders give a stronger grip than regular mechanical holders. You can also use special shank designs, such as ToughGRIP or Safe-Lock, to stop the tool from pulling out during roughing.
Follow these steps for the best tool setup:
Pick a secure tool holder, like shrink-fit or press-fit, to keep the tool steady.
Choose the largest roughing end mill that fits your job. Bigger tools reduce bending and give more stability.
Set the right depth of cut. This keeps the chip thickness correct and avoids extra stress on the cutting edge.
Use coated tools that match your workpiece. Coatings help your tool last longer and let you use higher speeds.
Use flood coolant to lower cutting forces and improve the finish.
Try variable pitch or variable helix end mills to cut down on vibration and chatter.
Always check the tool geometry to make sure it fits your material.
Keep the tool length as short as possible for more rigidity.
Use climb milling when you can. This method lowers tool stress and gives a better surface.
Follow the manufacturer's cutting parameters for speeds and feeds.
Note: Adjust your radial stepovers based on the flute count. This helps you keep a good surface finish and lets you use higher feed rates during roughing.
Maintenance
Good maintenance keeps your roughing end mills sharp and ready for every job. Clean your tools after each use to remove chips and coolant. Use special cleaning solutions that do not harm the cutting edges. Dry the tools with compressed air to stop rust and corrosion.
Here are some simple maintenance steps:
Apply a thin layer of rust inhibitor if you plan to store the tool for a long time.
Store each roughing end mill in its own sleeve or case. This prevents damage from bumps or chemical reactions.
Check the cutting edges often. If they look dull, regrind them to keep the tool sharp.
Always use the right speeds and feeds for your material and tool. This reduces wear and keeps your roughing end mill working longer.
Make sure chips move away from the cutting area. Use coolant or air blasts to help with chip evacuation.
Keep your milling machine in good shape. A well-calibrated machine reduces vibration and uneven wear.
Handle your tools with care. Avoid dropping them or using the wrong settings.
Tip: Regular maintenance extends the life of your roughing end mills and keeps your cutting performance high.
Maximizing Tool Life
You want your roughing end mills to last as long as possible. Long tool life saves you money and keeps your machining jobs running smoothly. Machining experts recommend several strategies to help you get the most from your tools.
Set the Right Cutting Parameters
Always match your cutting speed and feed rate to the material you are machining. For example, use higher speeds for aluminum alloys. Use lower speeds for stainless steel. This helps prevent overheating and reduces tool wear.
Apply Coolant Properly
Use coolant to keep your tool cool and remove chips. High-pressure coolant systems work best. They help carry away heat and chips, which lowers thermal stress on your tool.
Maintain Optimal Depth of Cut
Choose the right depth of cut for your operation and material. Avoid making cuts that are too deep or too shallow. This keeps the load on your tool steady and prevents breakage.
Use Advanced Tool Path Strategies
Try tool paths like trochoidal milling or High Efficiency Milling (HEM). These methods spread wear evenly across the tool and reduce sudden changes in load. You get smoother cuts and longer tool life.
Regrind Tools Regularly
Sharpen your roughing end mills before they get too dull. Regular regrinding keeps the cutting edges sharp and prevents early tool failure.
Select the Right Tool Coating
Pick coatings that match your job. For high temperatures, use TiAlN. For nonferrous materials, use DLC. The right coating reduces friction and heat, helping your tool last longer.
Follow Good Cleaning and Storage Habits
Clean your tools after each use. Inspect them for damage. Store them in a dry, safe place to protect the cutting edges and coatings.
Ensure Proper Tool Holding and Setup
Use rigid tool holders and make sure your tool is set up straight. This reduces vibration and runout, which can quickly wear out your tool.
Tip: High Efficiency Milling (HEM) helps you get the most from your roughing end mills. HEM uses a light radial depth of cut and a high axial depth of cut. You run your machine at higher speeds and feeds. This keeps more of the tool engaged in the cut, spreads wear evenly, and reduces vibration. You get faster material removal and longer tool life.
Note: Always check your setup before starting a job. A stable setup with the right parameters makes a big difference in how long your tool lasts.
By following these steps, you can maximize the life of your roughing end mills. You will spend less on new tools and keep your machining process efficient and reliable.
Troubleshooting
Tool Wear
When you use roughing end mills, you should look for tool wear. Finding problems early helps you avoid bigger issues. It also keeps your work running well. You might feel more shaking or hear chattering sounds. Sometimes, you need to push harder to cut the material. The part’s surface may look rough or bumpy. These signs mean your tool could be getting worn out.
Here are some signs of tool wear and how to spot them:
Sign of Tool Wear | Description and Detection Method |
Poor Surface Finish | The surface looks jagged or uneven; check by looking at it. |
Chipping | Small chips or breaks on the tool’s edge; look closely after use. |
Thermal Cracking | Cracks from heat; check the tool and watch the temperature. |
Fracture | The tool breaks suddenly; you might hear a snap or see a warning. |
Notching | Grooves or marks at the tool’s shoulder; look for these signs. |
Plastic Deformation | The tool edge bends from heat; check for soft or bent edges. |
Built-up Edge | Metal sticks to the edge; look for extra material on the tool. |
Abrasive Wear | The tool gets dull from hard particles; notice if cutting is harder. |
Flank Wear | The edge wears down; check for dullness and more force needed. |
Crater Wear | Small pits on the tool face; look at the surface for these spots. |
You can find these problems early by checking your tools often. Watch for changes in how your tool works. Measure and inspect your tool to know when to replace it.
Performance Issues
You might have some problems when using roughing end mills. These issues can slow your work or hurt your parts. Common problems are tool wear, chipping, chatter, vibration, rough surfaces, and chip clogging. Sometimes, using coolant wrong can cause thermal shock. Some metals, like stainless steel, can get harder while you cut them.
Most problems happen because of wrong settings. If you use the wrong speed or feed, your tool wears out fast. If the tool sticks out too far, it can bend and shake. Weak machines can also cause chatter. To fix these problems, try these steps:
Change your speed and feed to fit the tool and material.
Keep the tool stickout as short as you can.
Control how deep you cut to avoid overloading the tool.
Use the right coating and helix angle for your material.
Split roughing into more passes if needed.
Make sure your setup is strong and stable.
Check and store your tools the right way.
Tip: Changing tools often and doing good maintenance helps you avoid sudden tool breaks and keeps your work going smoothly.
Preventing Chatter
Chatter is a common problem when roughing, especially at high speeds. It causes shaking, loud noise, and rough surfaces. You can stop chatter by making your setup strong and steady. Use a rigid workholding system and keep the tool overhang short. Pick roughing end mills with serrated edges to help lower vibration.
Here are some ways to stop chatter:
Change spindle speed to avoid shaking at certain speeds.
Balance feed rate and depth of cut for smoother cutting.
Use climb milling to match cutting forces with your setup.
Pick tools with the right shape and coating for your material.
Keep your machine in good shape and the base solid.
Try adaptive toolpaths like high-efficiency milling to keep the load even.
Note: Using combination end mills or tools made for stability lets you cut deeper and run faster without chatter.
If you follow these troubleshooting tips, you can fix most roughing end mill problems and keep your work running well.
Roughing end mills let you take off lots of material fast. They make your work go quicker and keep your area cleaner by breaking chips into small bits.
Remember, if you choose and use roughing end mills the right way, you work faster and spend less on new tools. Try these ideas to get better results and keep your tools in good shape for longer.
FAQ
What is the main purpose of a roughing end mill?
You use a roughing end mill to remove large amounts of material quickly. This tool helps you shape your workpiece fast before you make the final, smooth cuts.
Can you use a roughing end mill for finishing?
You should not use a roughing end mill for finishing. It leaves a rough surface. For a smooth finish, switch to a finishing end mill after roughing.
How do you know when to replace a roughing end mill?
Watch for dull edges, chipped teeth, or a rougher surface on your part. If you hear more noise or feel more vibration, your tool may need replacing.
What materials can you cut with a roughing end mill?
You can cut many materials, such as steel, aluminum, cast iron, titanium, and some plastics. Always choose the right tool and coating for your material.
How do serrated edges help in roughing end mills?
Serrated edges break chips into smaller pieces. This helps you remove chips faster, lowers cutting force, and keeps your tool cooler.
Do you need coolant when using a roughing end mill?
Coolant helps keep your tool cool and removes chips. You should use coolant, especially when cutting hard metals or running at high speeds.
What is the best way to store roughing end mills?
Store each tool in its own case or sleeve. Keep them dry and clean. This prevents damage and rust.
Can you use roughing end mills on a manual milling machine?
Yes, you can use roughing end mills on manual machines. Make sure your machine is strong enough and set the right speeds and feeds.
 English
 العربية
 Français
 Русский
 Español
 Português
 Deutsch
 italiano
 日本語
日本語 한국어
한국어 Nederlands
 Tiếng Việt
 ไทย
ไทย Polski
 Türkçe
 ພາສາລາວ
 ភាសាខ្មែរ
 Bahasa Melayu
 ဗမာစာ
ဗမာစာ Filipino
 Bahasa Indonesia
 magyar
 Română
 Čeština
 Монгол
 қазақ
қазақ Српски
 हिन्दी
 فارسی
فارسی Slovenčina
 Slovenščina
 Norsk
Norsk Svenska
 українська
 Ελληνικά
 Suomi
Suomi Հայերեն
 עברית
עברית Latine
 Dansk
Dansk বাংলা
বাংলা Hrvatski
 Gaeilge
 Oʻzbekcha
 latviešu
 Беларуская мова
 Български
 Lietuvių
 Gaelo Albannach
 ئۇيغۇرچە
 Cymraeg


